Setup Guide
Add a TV Tuner to Jellyfin (Automatic Discovery)
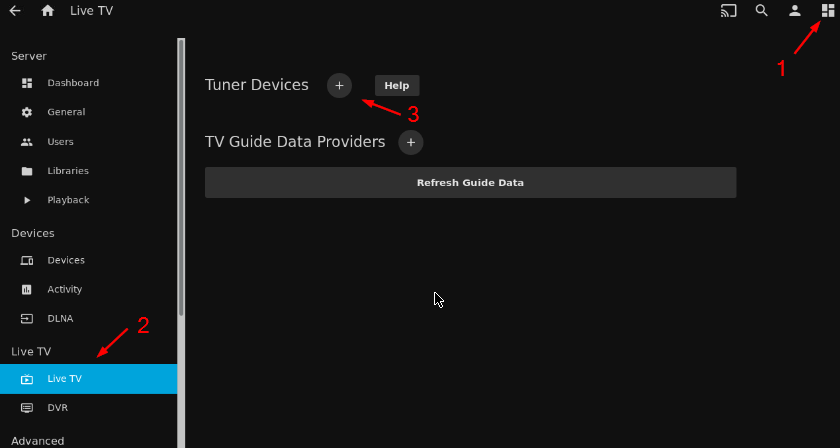
Click on the Admin Panel Icon in the top right corner (1) Click 'Live TV' (2) under the 'Live TV' section Click the '+' button (3) next to 'Tuner Devices'
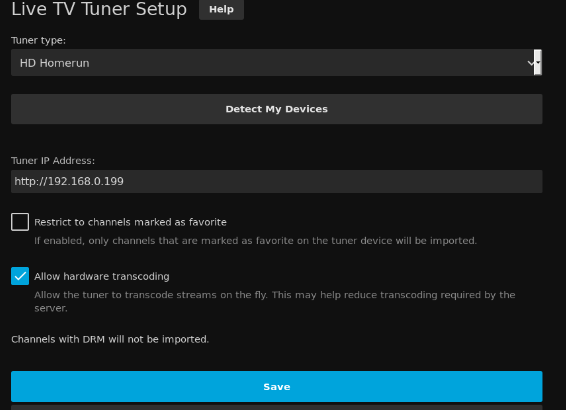
Click 'Detect My Devices' from the 'Live TV Tuner Setup' page that opens Jellyfin will search and hopefully find your tuner automatically:

Click on the device you'd like to set up then set any options then click 'Save'
Add a TV Tuner to Jellyfin (Manual Setup)
You can set up your tuners manually if they were not automatically discovered. Click the 'Tuner Type' pull down. Choose between 'HD Homerun', 'M3U Tuner', and 'Other'

HDHomeRun Specific Options
-
Tuner IP Address is the URL of your HDHomeRun device. The format will be
http://YOUR.IP.ADDRESS -
Allow hardware transcoding will allow the tuner to transcode the video on the fly which can reduce server load. Not all HDHomeRun devices support hardware transcoding.
-
Restrict to channels marked as favorite will only import channels that are designated as favorite channels on the tuner. This helps if your tuner autoscans and adds new channels that you do not want and/or adds channels that you are able to receive due to atmospheric conditions but later are not accessible.
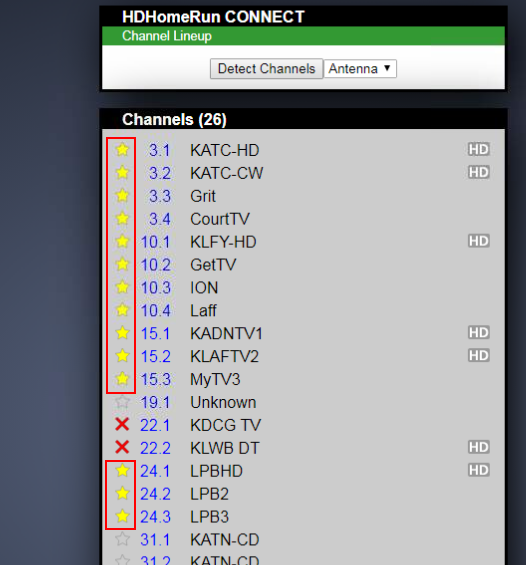
To set a favorite, go to the HDHomeRun website, select your tuner and then click on the grey star next to the channel name to change the star to yellow. The yellow star indicates a favorited channel. In this example, only the channels with yellow stars will be imported into Jellyfin
Using a legacy HDHomeRun unit requires an initial scan from the HDHomeRun Setup utility, using a Windows PC. Otherwise, Jellyfin will not recognize any channels from the tuner and "Map Channels" page will be empty.
Legacy products include: HDHR-US, HDHR-EU, HDHR-T1-US, HDHR3-US, HDHR3-DT, and HDHR3-EU.
Software and Instructions can be found here:
M3U Tuner Specific Options
This tuner allows you to add IPTV channel to Jellyfin by using the appropriate M3U8 playlist file.
-
File or URL is the location of the M3U8 playlist. The file can either be stored online at a web (HTTP) address or stored locally.
-
User agent is needed in special cases where you need to supply a custom HTTP header to access the remotely stored M3U8 playlist
-
Simultaneous stream limit will restrict the number of streams the server can have open at one time. Setting this value to '0' will allow for unlimited streams
-
Auto-loop live streams is sometimes necessary for some IPTV channels. Turn this on only if your streams are not playing correctly
Here is a list of legal samples to use to test connectivity.
LegalStream Live News Playlist - Deprecated as of 2022.
Adding Guide Data
Guide data is necessary for scheduling tv recordings and for browsing what's currently playing and what will air later. Follow these steps once you have a tuner device set up. Click on the Admin Panel Icon in the top right corner, Click 'Live TV' (2) under the 'Live TV' section, Click the '+' button next to 'TV Guide Data Providers' :

Choose between 'Schedules Direct' and 'XMLTV'. You currently cannot use both at the same time.
Schedules Direct:
Schedules Direct is a paid service that provides U.S., Canadian, and other guide data for use in OSS projects. They are a non-profit with a low membership fee. The guide data is highly reliable. You will have to create an account at their website.
XMLTV:
This option allows for downloading of guide data in the XMLTV format.
Mapping Channels
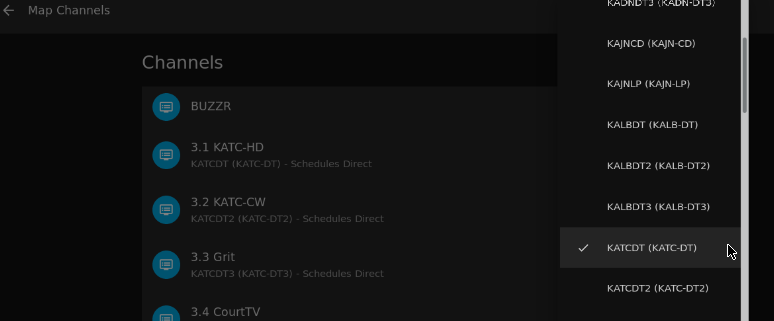
Guide data from the 'TV Guide Data Providers' will need to be mapped to the physical channel from the tuner. Click the '...' next to the guide provider you set up and select 'Map Channels'

The list of physical channels will be displayed. Click the pencil icon to the right of the channel and then select the corresponding channel from the guide provider to map the channel. Do this for all channels. Click the left arrow at the top left of the window to exit and save the information.
The guide data will now automatically import. You can check that the data has been imported correctly by going to the 'Live TV Guide' page from the main Jellyfin web page on your server.
Integrating TVHeadend without a plugin
It's possible to use TVHeadend with Jellyfin through as an M3U/XMLTV integrations. This integration requires more CPU processing, and the plugin is therefore recommended. This approach can be used as a backup when the plugin does not work.
- Go to LiveTV, Tuner devices, and add a new M3U Tuner
- Set the URL to point to
http://your.tvheadend.server:port/playlist/channels.m3u - Press save
- Go to LiveTV, TV Guide Data Providers, and add a new XMLTV source
- Set the URL to point to
http://your.tvheadend.server:port/xmltv/channels - Press save
Wait for the Guide data to refresh.